The first time I tried kombucha, I thought it tasted like vinegar and was not impressed. As my interest in fermented foods grew, and I became more adventuresome, I decided to give kombucha a chance. So, I bought several different flavors and found a couple that I thought were palatable. As I tried more and kept drinking it, the taste grew on me. But this habit of buying kombucha from the store is expensive. And you cannot customize the flavor, which is the beauty of making your own fermented foods. Also, I wanted my own microbial community (how fun is that?). So, I began to make kombucha at home. Now, I want to share what I’ve learned along the way.
Here’s a guide to kombucha for anyone who would like to try making it at home but also wants to know about the microbiology behind it.
This kombucha guide covers the following questions:
Kombucha is a fermented tea beverage with a bit of fizziness and tastes slightly vinegary and slightly sweet. The flavor depends on how long you allow it to ferment and which ingredients you add — like fruits or flavorings such as ginger or basil — during the second fermentation.
Kombucha has become pretty popular in the US. Many people assume that because it is fermented, it has an unreasonable amount of health benefits. But the truth is that those health benefits have not even been proven in humans yet. But we’ll get to that later.
On the other hand, there are many reasons why drinking and making kombucha at home is a life-enhancing pastime. It is not only fun but also delicious. I enjoy customizing the flavor. And it’s fun to have your own microbial community you cultivate in your home (besides all of the other microbes you don’t notice because they’re invisible). Also, it doesn’t hurt to expose your body to potentially beneficial microbes.
Kombucha contains both bacteria and fungi, specifically yeast. To make kombucha, you use a starter culture called a “scoby,” a “symbiotic community of bacteria and yeast.” So, multiple types of microorganisms live in kombucha and create its unique flavor.
The different types of bacteria in kombucha can vary based on where it was made and the stage of fermentation. But the community in kombucha usually easily outcompetes any pathogenic bacteria or yeast. To me, it’s one of the least demanding fermented foods to maintain because you can allow it to over ferment every once in a while without making the scoby unusable. However, the flavor is not enjoyable when it over ferments. So, I don’t recommend drinking it in that case.
I will say, though, that the scoby in kombucha is pretty hideous-looking. It’s a rubbery pancake-like mass that is mostly made of cellulose. Cellulose is a substance that we mostly think of plants having, so you can find it in wood, cotton, and paper. But bacteria also make cellulose, and in the case of kombucha, they make a lot of it. Learn more about kombucha cellulose in this post.
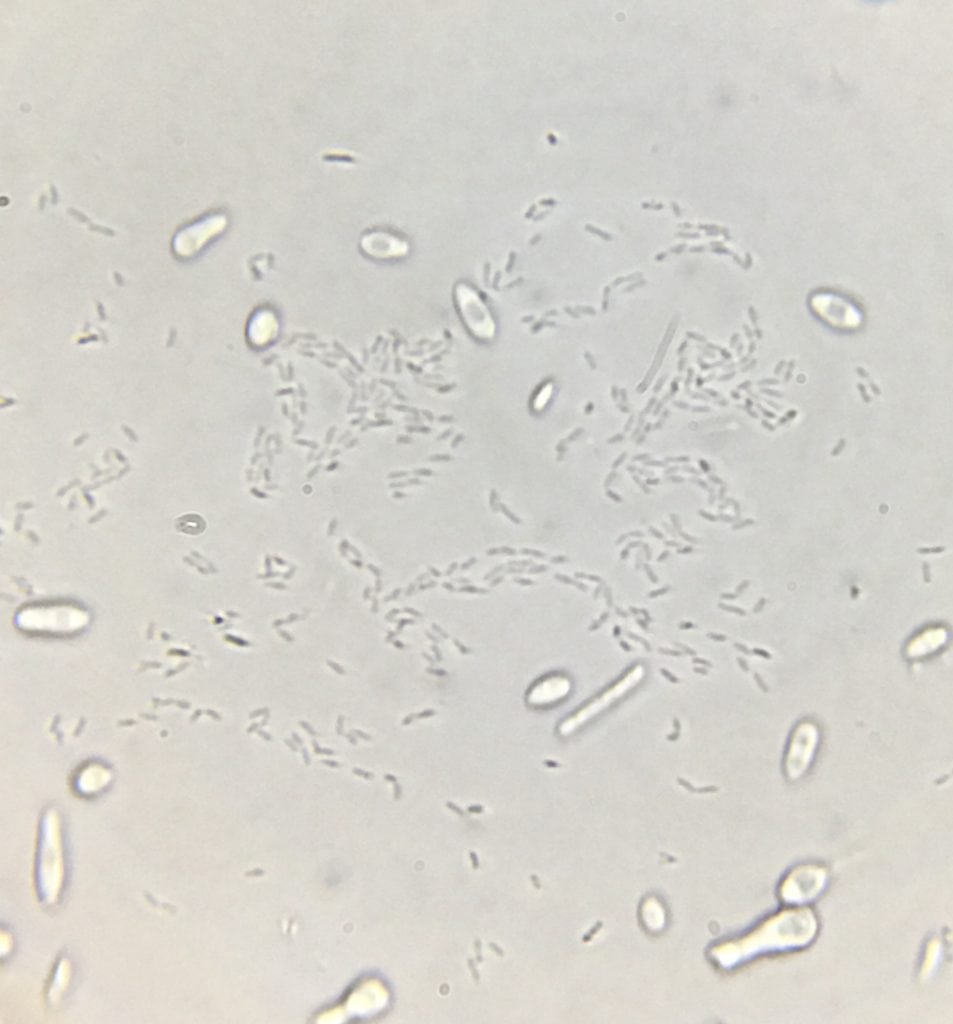
Kombucha microbes under the microscope. Photo by Justine Dees.
Want to take a photo like this of your kombucha microbes?
Check out this post to learn about the microscope and phone camera adapter I used to take this photo.
The most common bacteria found in kombucha are Komagataeibacter spp., Acetobacter spp., and Gluconobacter spp.
The yeasts in kombucha include Zygosaccharomyces spp., Candida spp., Brettanomyces spp., and Saccharomyces spp., among others.
So, is kombucha good for you? Is kombucha good for the microbiome? How does it work in your body? Here a few benefits to drinking kombucha.
Fermented foods, in general, provide a way to introduce potentially beneficial microorganisms to your body. However, when it comes to kombucha, we don’t know for sure how much it helps humans because few if any human studies have been done. It does provide a yummy, lower-calorie fizzy beverage to enjoy and replace soda.
Many people (fermentation gurus) make claims that kombucha has amazing health benefits, but these claims are not backed by studies in humans. They are based on studies in animals, cells in the lab, or assumptions based on the benefits of other fermented foods. That doesn’t mean that it has no benefits to humans. It means we need more evidence to say it is doing wonderful things for us. I’m sorry to say, but it is not a miracle beverage. But what the limited studies in animals and cells say is that it has benefits because it contains vitamins, and it may help your immune system and gastrointestinal health.
Learn more about the health benefits of fermented foods here: Fermented Foods Part 3: Can fermented foods make us healthier?
So, although the health benefits in humans are inconclusive, I do enjoy both making it and drinking it. Marking it is fun because it’s like having a pet — it’s fun to watch it grow. And I drink it mostly because I think it’s tasty and I like the idea of exposing my body to potentially beneficial microbes.
This post contains affiliate links — see my disclosure policy.
Small saucepan
Gallon jar – buy two here
Measuring cups
Towels or gauze to cover
Rubber band
Long spoon
Funnel – buy two here
Thermometer on side of jar – buy two here
Smaller glass bottles (16-ounce bottles)
Strainer – buy one here
Black tea (doesn’t need to be anything fancy — I use Lipton)
Sugar
Scoby – buy a scoby and starter tea here
Kombucha starter tea
The first thing you have to do is find a scoby from someone, either from a friend or someone online. You can buy one on Amazon here (it’s the same one I have and comes with great instructions).
You need a scoby as well as “starter tea,” which is some fermented kombucha tea from a previous batch (don’t worry, the scoby I mentioned above comes with this). You have to add a portion of the old batch to your new batch of kombucha, which is a way of inoculating the sweet tea with the microbes. I emphasize this because it was a misconception of mine when I first learned about kombucha brewing. I assumed you only needed the scoby. But you also need some of the fermented tea.
One important tip before you get started: wash your hands and keep them clean the entire time. Think about all possible sources of contamination as you work, and avoid them. I usually keep everything covered while I am working. That includes the finished batch of kombucha, the scobys after removing and setting them aside while preparing your new batch, and the starter tea.
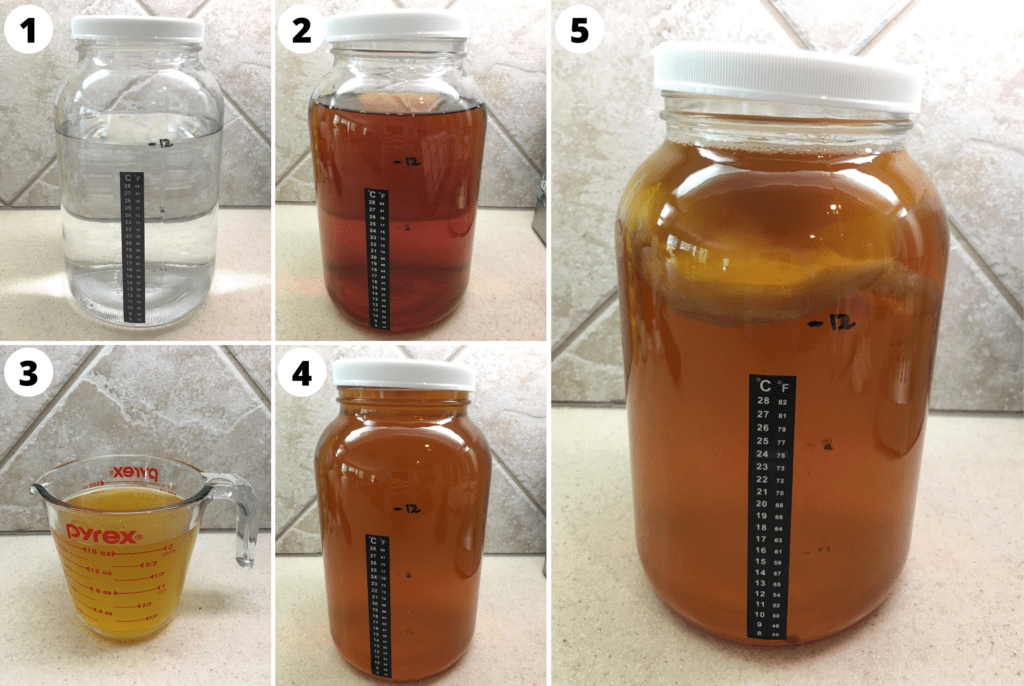
How to make kombucha: 1) Add water, 2) add concentrated brewed tea + sugar, 3) add the starter tea, 4) remove some of the mixture so the scoby will fit, 5) add your scoby. Then, cover with a towel and gauze. I use the lid to cover it while I am working to prevent contamination. Photos by Justine Dees.
If you have a previous batch of kombucha you are working with, remove the scobys and set them aside in a glass vessel. Remove 2 cups of the kombucha from this “finished” batch, and set it aside — this will be your starter tea.
Into a gallon jar (you can buy one on Amazon), put 12 cups of cold or room temperature filtered water. Boil two cups of water in a small saucepan and make your tea, using six regular-sized tea bags. Brew for 10 minutes. Remove the tea bags and dissolve one cup of sugar. Add this concentrated tea to the 12 cups of cold water. (I love this method because it lowers the temperature of the freshly brewed tea to right about the perfect temperature to add the starter tea and scoby).
Mix in your two cups of starter culture (which either came with the scoby or from your previous batch). I found that I needed to remove a portion of this entire mixture for the scoby to fit in the gallon jar. So, I use the extra liquid for my scoby hotel, which I’ll explain later. Then, add your scoby.
Let it sit and ferment covered with gauze or a towel with a rubber band to secure it. The length of time for it to reach your desired flavor will vary based on the temperature of the location where you store it. You can buy a heated mat for your kombucha, but it’s unnecessary because the fermentation can take place at different temperatures without any harm to the culture. You can monitor the temperature with an adhesive thermometer on the jar (buy two here).
At first, I recommend testing the pH to get comfortable with the whole process. After adding the starter tea, the pH of the mixture should drop to 4.5 or below. You can monitor the pH with test strips (buy some here). Remove a small amount of kombucha with a spoon, and test the pH, then throw away that liquid (do not put it back). Your kombucha is ready to drink when the pH is between 2.5 and 3.5.
Usually, the first fermentation takes around 10 days for me. However, if you are starting from scratch with a new scoby, it may take longer. So, the pH test strips are useful during this time. I start tasting it around day seven. When I made my first batch, I tasted it on day seven, but it was still too sweet. So, I let it ferment longer and tasted it each day, which I highly recommend doing your first time or two.
Once it reaches your desired flavor, you are ready to bottle and prepare for the optional second fermentation.
A note about your scoby: After you make your first batch, you likely will never need to repurchase a scoby because you can reuse yours. In fact, it will get to the point where you have too many scobys, which is why you may want to make a scoby hotel (which I explain later in the post).
For the second fermentation, I recommend using 16-ounce glass bottles. Before getting into home-brewing, I bought many bottles of kombucha from the store and kept them. These are great because the glass is strong and can withstand the pressure from the carbonation.
I always like doing a secondary fermentation because it makes the kombucha really fizzy. And I also enjoy the flavor better when I add fruit. My favorite second ferment to do is strawberries and blueberries. Sometimes I add ginger along with the strawberries and blueberries.
Here’s a tip if you are adding ginger: I usually have a hard time using all of the ginger that I buy. So, to prevent it from going bad and make it easy to add to kombucha (or anything else) I cut up the ginger into small pieces and freeze them. That way, I can grab one little frozen piece when I need it.
The first and most crucial step is to save some of your kombucha to use as your starter tea in your next batch. So, remove your scoby, set it aside, stir the kombucha with a long spoon, and then remove and set aside 2 cups of kombucha.
Blend frozen strawberries and blueberries with some water. Make enough so you can add a quarter of a cup into each 16-ounce glass bottle. (A gallon will make about 7 16-ounce bottles because you will save 2 cups for your starter tea.)
Using a funnel (buy funnels here), add ¼ cup of the strawberry-blueberry mixture to each 16-ounce bottle.
Add kombucha to fill up the bottle. Screw on the caps tight.
Let it sit and ferment at room temperature. Check how fizzy it is each day. It can ferment for up to four to five days, depending on the temperature of the brewing location. But it may go faster or slower, so always check it to make sure it doesn’t get to the point that the bottles explode (read more about fermentation safety here).
When your second ferment is finished, you will end up with a baby scoby at the top. And with the added ingredients like strawberries and blueberries, you may enjoy your kombucha better after straining it. Here’s the strainer I use.
Store your finished kombucha in the refrigerator to slow the fermentation process.
Your scoby will inevitably end up making lots of scoby “babies,” which appear as new layers on the bottom of the “mother” scoby. So, I recommend making a scoby hotel to keep some of these extra scobys for emergency purposes. You will likely make mistakes or have something go wrong with your kombucha: you may spill it, forget to keep your starter tea, or get some mold contamination.
One time when my first fermentation was finished, I used all of my kombucha up without setting aside 2 cups of it for my next batch. I guess I zoned out. I don’t know. It was horrifying. But, thankfully, I had a scoby hotel going, so I used 2 cups of that liquid as my starter tea for the new batch. So, if that’s the only reason you do it, I’d say it’s worth it.
Another reason to have extra scobys is to make an experimental batch of kombucha where you add different ingredients or use a different tea during the first fermentation. For an experimental batch, I don’t recommend using your only scoby. So, you can use one of your extra scobys from your scoby hotel.
Even with a scoby hotel, it has gotten to the point where I’ve had to throw some away, which I hated having to do. But it gets to be too much if you don’t have someone who wants to take them off your hands.
To make a scoby hotel, peel away some of the scobys from the mother scoby. They usually come off in layers. Add a layer or two of scoby to a fresh batch of kombucha (at the beginning of the first fermentation), and add the scoby babies to the scoby hotel (an empty glass container for now). Then, add 2 parts finished kombucha tea to 1 part fresh sweet tea. The total amount will depend on how much liquid you need to cover your scobys.
Then, each time you make a new batch of kombucha, remove some of the old kombucha from the hotel and replace it with some freshly made kombucha (starter tea + fresh sweet tea). Or if your hotel is getting a little crowded and you need to increase the total volume, simply add a small amount of freshly made kombucha to the hotel to feed the microbes.
Here’s a helpful video on YouTube about how to make a scoby hotel.
So, that’s your introduction to kombucha. Are you excited to start brewing kombucha at home? I can’t wait to hear how it goes for you! Feel free to tag me on social media or send me an email.
The post A Guide to Kombucha Fermentation and Microbiology appeared first on Joyful Microbe.
Here’s a guide to kombucha for anyone who would like to try making it at home but also wants to know about the microbiology behind it.
This kombucha guide covers the following questions:
- What is kombucha?
- What microbes are found in kombucha?
- What are the benefits of drinking kombucha?
- How do you make it?
- Bonus: How do you make a scoby hotel?
What is kombucha?
Kombucha is a fermented tea beverage with a bit of fizziness and tastes slightly vinegary and slightly sweet. The flavor depends on how long you allow it to ferment and which ingredients you add — like fruits or flavorings such as ginger or basil — during the second fermentation.
Kombucha has become pretty popular in the US. Many people assume that because it is fermented, it has an unreasonable amount of health benefits. But the truth is that those health benefits have not even been proven in humans yet. But we’ll get to that later.
On the other hand, there are many reasons why drinking and making kombucha at home is a life-enhancing pastime. It is not only fun but also delicious. I enjoy customizing the flavor. And it’s fun to have your own microbial community you cultivate in your home (besides all of the other microbes you don’t notice because they’re invisible). Also, it doesn’t hurt to expose your body to potentially beneficial microbes.
What microbes are found in kombucha?
Kombucha contains both bacteria and fungi, specifically yeast. To make kombucha, you use a starter culture called a “scoby,” a “symbiotic community of bacteria and yeast.” So, multiple types of microorganisms live in kombucha and create its unique flavor.
The different types of bacteria in kombucha can vary based on where it was made and the stage of fermentation. But the community in kombucha usually easily outcompetes any pathogenic bacteria or yeast. To me, it’s one of the least demanding fermented foods to maintain because you can allow it to over ferment every once in a while without making the scoby unusable. However, the flavor is not enjoyable when it over ferments. So, I don’t recommend drinking it in that case.
I will say, though, that the scoby in kombucha is pretty hideous-looking. It’s a rubbery pancake-like mass that is mostly made of cellulose. Cellulose is a substance that we mostly think of plants having, so you can find it in wood, cotton, and paper. But bacteria also make cellulose, and in the case of kombucha, they make a lot of it. Learn more about kombucha cellulose in this post.
Kombucha microbes under the microscope. Photo by Justine Dees.
Want to take a photo like this of your kombucha microbes?
Check out this post to learn about the microscope and phone camera adapter I used to take this photo.
Bacteria
The most common bacteria found in kombucha are Komagataeibacter spp., Acetobacter spp., and Gluconobacter spp.
Yeast
The yeasts in kombucha include Zygosaccharomyces spp., Candida spp., Brettanomyces spp., and Saccharomyces spp., among others.
What are the benefits of drinking kombucha?
So, is kombucha good for you? Is kombucha good for the microbiome? How does it work in your body? Here a few benefits to drinking kombucha.
Fermented foods, in general, provide a way to introduce potentially beneficial microorganisms to your body. However, when it comes to kombucha, we don’t know for sure how much it helps humans because few if any human studies have been done. It does provide a yummy, lower-calorie fizzy beverage to enjoy and replace soda.
Many people (fermentation gurus) make claims that kombucha has amazing health benefits, but these claims are not backed by studies in humans. They are based on studies in animals, cells in the lab, or assumptions based on the benefits of other fermented foods. That doesn’t mean that it has no benefits to humans. It means we need more evidence to say it is doing wonderful things for us. I’m sorry to say, but it is not a miracle beverage. But what the limited studies in animals and cells say is that it has benefits because it contains vitamins, and it may help your immune system and gastrointestinal health.
Learn more about the health benefits of fermented foods here: Fermented Foods Part 3: Can fermented foods make us healthier?
So, although the health benefits in humans are inconclusive, I do enjoy both making it and drinking it. Marking it is fun because it’s like having a pet — it’s fun to watch it grow. And I drink it mostly because I think it’s tasty and I like the idea of exposing my body to potentially beneficial microbes.
How do you make kombucha?
This post contains affiliate links — see my disclosure policy.
Supplies
Small saucepan
Gallon jar – buy two here
Measuring cups
Towels or gauze to cover
Rubber band
Long spoon
Funnel – buy two here
Thermometer on side of jar – buy two here
Smaller glass bottles (16-ounce bottles)
Strainer – buy one here
Ingredients
Black tea (doesn’t need to be anything fancy — I use Lipton)
Sugar
Scoby – buy a scoby and starter tea here
Kombucha starter tea
First fermentation
Scoby and fermented tea
The first thing you have to do is find a scoby from someone, either from a friend or someone online. You can buy one on Amazon here (it’s the same one I have and comes with great instructions).
You need a scoby as well as “starter tea,” which is some fermented kombucha tea from a previous batch (don’t worry, the scoby I mentioned above comes with this). You have to add a portion of the old batch to your new batch of kombucha, which is a way of inoculating the sweet tea with the microbes. I emphasize this because it was a misconception of mine when I first learned about kombucha brewing. I assumed you only needed the scoby. But you also need some of the fermented tea.
Keep your hands clean and think of all sources of contamination
One important tip before you get started: wash your hands and keep them clean the entire time. Think about all possible sources of contamination as you work, and avoid them. I usually keep everything covered while I am working. That includes the finished batch of kombucha, the scobys after removing and setting them aside while preparing your new batch, and the starter tea.
How to make kombucha: 1) Add water, 2) add concentrated brewed tea + sugar, 3) add the starter tea, 4) remove some of the mixture so the scoby will fit, 5) add your scoby. Then, cover with a towel and gauze. I use the lid to cover it while I am working to prevent contamination. Photos by Justine Dees.
Let’s get started with the first fermentation
If you have a previous batch of kombucha you are working with, remove the scobys and set them aside in a glass vessel. Remove 2 cups of the kombucha from this “finished” batch, and set it aside — this will be your starter tea.
Into a gallon jar (you can buy one on Amazon), put 12 cups of cold or room temperature filtered water. Boil two cups of water in a small saucepan and make your tea, using six regular-sized tea bags. Brew for 10 minutes. Remove the tea bags and dissolve one cup of sugar. Add this concentrated tea to the 12 cups of cold water. (I love this method because it lowers the temperature of the freshly brewed tea to right about the perfect temperature to add the starter tea and scoby).
Mix in your two cups of starter culture (which either came with the scoby or from your previous batch). I found that I needed to remove a portion of this entire mixture for the scoby to fit in the gallon jar. So, I use the extra liquid for my scoby hotel, which I’ll explain later. Then, add your scoby.
Let it sit and ferment covered with gauze or a towel with a rubber band to secure it. The length of time for it to reach your desired flavor will vary based on the temperature of the location where you store it. You can buy a heated mat for your kombucha, but it’s unnecessary because the fermentation can take place at different temperatures without any harm to the culture. You can monitor the temperature with an adhesive thermometer on the jar (buy two here).
At first, I recommend testing the pH to get comfortable with the whole process. After adding the starter tea, the pH of the mixture should drop to 4.5 or below. You can monitor the pH with test strips (buy some here). Remove a small amount of kombucha with a spoon, and test the pH, then throw away that liquid (do not put it back). Your kombucha is ready to drink when the pH is between 2.5 and 3.5.
Usually, the first fermentation takes around 10 days for me. However, if you are starting from scratch with a new scoby, it may take longer. So, the pH test strips are useful during this time. I start tasting it around day seven. When I made my first batch, I tasted it on day seven, but it was still too sweet. So, I let it ferment longer and tasted it each day, which I highly recommend doing your first time or two.
Once it reaches your desired flavor, you are ready to bottle and prepare for the optional second fermentation.
A note about your scoby: After you make your first batch, you likely will never need to repurchase a scoby because you can reuse yours. In fact, it will get to the point where you have too many scobys, which is why you may want to make a scoby hotel (which I explain later in the post).
Second Fermentation
A bit of info before starting
For the second fermentation, I recommend using 16-ounce glass bottles. Before getting into home-brewing, I bought many bottles of kombucha from the store and kept them. These are great because the glass is strong and can withstand the pressure from the carbonation.
I always like doing a secondary fermentation because it makes the kombucha really fizzy. And I also enjoy the flavor better when I add fruit. My favorite second ferment to do is strawberries and blueberries. Sometimes I add ginger along with the strawberries and blueberries.
Here’s a tip if you are adding ginger: I usually have a hard time using all of the ginger that I buy. So, to prevent it from going bad and make it easy to add to kombucha (or anything else) I cut up the ginger into small pieces and freeze them. That way, I can grab one little frozen piece when I need it.
Let’s get started with the second fermentation
The first and most crucial step is to save some of your kombucha to use as your starter tea in your next batch. So, remove your scoby, set it aside, stir the kombucha with a long spoon, and then remove and set aside 2 cups of kombucha.
Blend frozen strawberries and blueberries with some water. Make enough so you can add a quarter of a cup into each 16-ounce glass bottle. (A gallon will make about 7 16-ounce bottles because you will save 2 cups for your starter tea.)
Using a funnel (buy funnels here), add ¼ cup of the strawberry-blueberry mixture to each 16-ounce bottle.
Add kombucha to fill up the bottle. Screw on the caps tight.
Let it sit and ferment at room temperature. Check how fizzy it is each day. It can ferment for up to four to five days, depending on the temperature of the brewing location. But it may go faster or slower, so always check it to make sure it doesn’t get to the point that the bottles explode (read more about fermentation safety here).
When your second ferment is finished, you will end up with a baby scoby at the top. And with the added ingredients like strawberries and blueberries, you may enjoy your kombucha better after straining it. Here’s the strainer I use.
Store your finished kombucha in the refrigerator to slow the fermentation process.
Scoby Hotel
Why you would make a scoby hotel
Your scoby will inevitably end up making lots of scoby “babies,” which appear as new layers on the bottom of the “mother” scoby. So, I recommend making a scoby hotel to keep some of these extra scobys for emergency purposes. You will likely make mistakes or have something go wrong with your kombucha: you may spill it, forget to keep your starter tea, or get some mold contamination.
One time when my first fermentation was finished, I used all of my kombucha up without setting aside 2 cups of it for my next batch. I guess I zoned out. I don’t know. It was horrifying. But, thankfully, I had a scoby hotel going, so I used 2 cups of that liquid as my starter tea for the new batch. So, if that’s the only reason you do it, I’d say it’s worth it.
Another reason to have extra scobys is to make an experimental batch of kombucha where you add different ingredients or use a different tea during the first fermentation. For an experimental batch, I don’t recommend using your only scoby. So, you can use one of your extra scobys from your scoby hotel.
Even with a scoby hotel, it has gotten to the point where I’ve had to throw some away, which I hated having to do. But it gets to be too much if you don’t have someone who wants to take them off your hands.
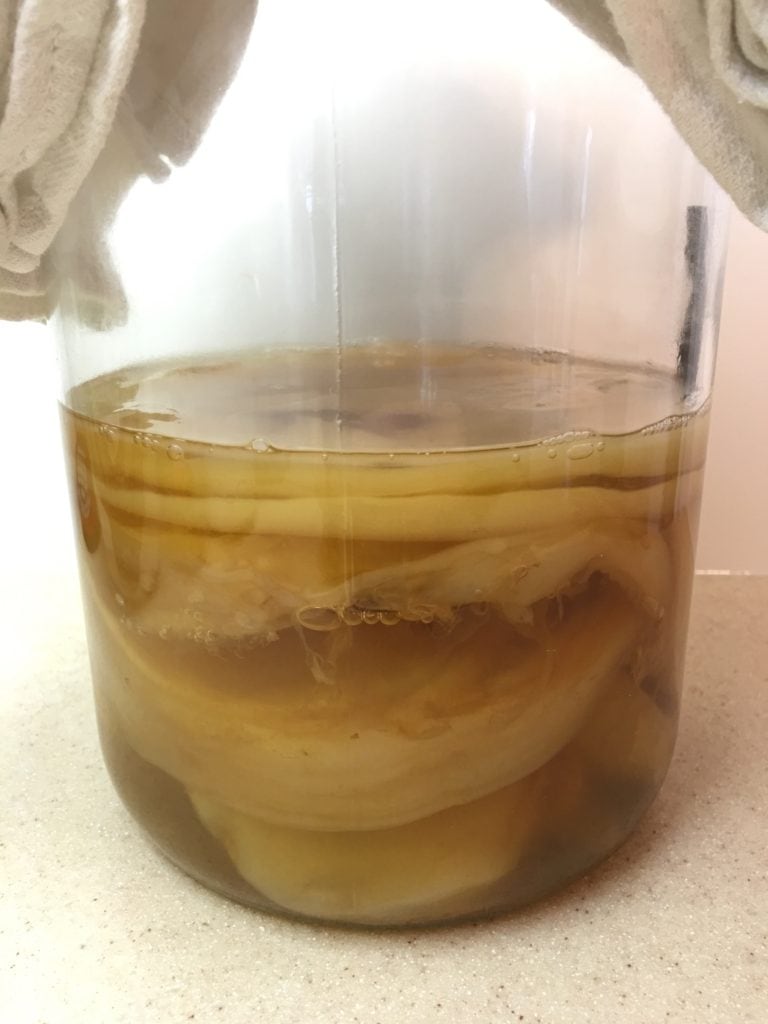
How to make a scoby hotel
To make a scoby hotel, peel away some of the scobys from the mother scoby. They usually come off in layers. Add a layer or two of scoby to a fresh batch of kombucha (at the beginning of the first fermentation), and add the scoby babies to the scoby hotel (an empty glass container for now). Then, add 2 parts finished kombucha tea to 1 part fresh sweet tea. The total amount will depend on how much liquid you need to cover your scobys.
Then, each time you make a new batch of kombucha, remove some of the old kombucha from the hotel and replace it with some freshly made kombucha (starter tea + fresh sweet tea). Or if your hotel is getting a little crowded and you need to increase the total volume, simply add a small amount of freshly made kombucha to the hotel to feed the microbes.
Here’s a helpful video on YouTube about how to make a scoby hotel.
So, that’s your introduction to kombucha. Are you excited to start brewing kombucha at home? I can’t wait to hear how it goes for you! Feel free to tag me on social media or send me an email.
The post A Guide to Kombucha Fermentation and Microbiology appeared first on Joyful Microbe.